Get ready to create the cutest and most delicious pumpkin patch your dinner table has ever seen! These incredible, from-scratch “Chicken Pumpkins” are the ultimate fun and festive main course for your next Halloween celebration or cozy autumn dinner. We’re talking about incredibly tender, juicy chicken, stuffed with a gooey, melted mozzarella cheese surprise, and coated in a super crispy, cheesy Cheddar cracker crust.
This isn’t just a recipe; it’s a guide to your new show-stopping, family-favorite meal. We’ll show you the simple but crucial secrets to the juiciest fried chicken and how to craft these adorable, edible pumpkins that are a guaranteed hit. This is the kind of satisfying, crowd-pleasing dish that will have everyone “oohing” and “aahing” and will make any night feel like a special occasion.
Table of Contents
Table of Contents
Recipe Overview: The Ultimate Fun & Festive Halloween Dinner
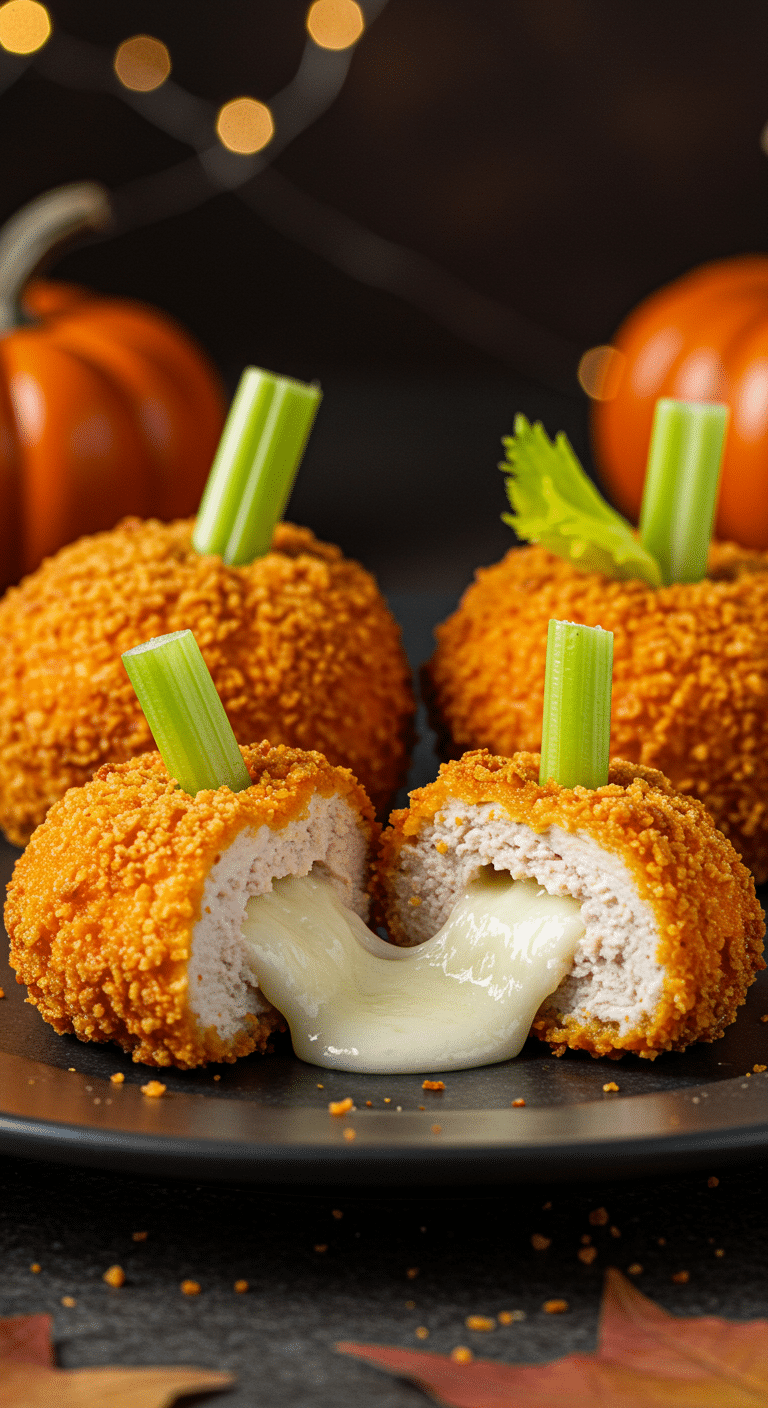
What makes these Chicken Pumpkins so spectacularly delicious is their brilliant combination of textures and their fun, whimsical presentation. This recipe is a masterpiece of comfort food creativity. The chicken is made unbelievably tender and juicy by soaking it in a simple buttermilk brine. The real magic, however, is in the crust and the filling. A crunchy, savory, and cheesy crust is created using crushed Cheddar crackers (like Cheez-It®!), and hidden inside each “pumpkin” is a molten core of melted mozzarella cheese. The entire creation is then deep-fried to a perfect, crispy golden brown and finished with a cute little celery “stem.”
| Metric | Time / Level |
| Total Time | 3 hours (includes brining & freezing) |
| Active Prep Time | 30 minutes |
| Difficulty Level | Intermediate |
| Servings | 8 pumpkins |
The Pumpkin Patch: The Essential Ingredients
This iconic party dish uses a handful of simple shortcuts to create its signature cheesy and crispy flavor.
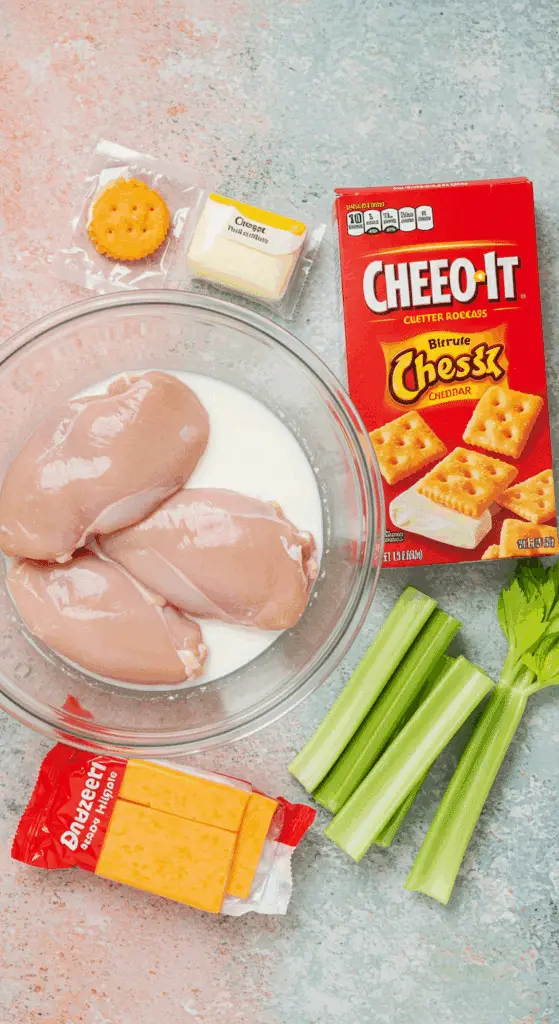
- The Chicken & Brine:
- Boneless, Skinless Chicken Breasts: The lean and versatile base for our pumpkins.
- Buttermilk: This is the secret to unbelievably tender and juicy chicken! The natural acidity and enzymes in buttermilk work as a fantastic, gentle tenderizer, ensuring your chicken stays perfectly moist, even after frying.
- The Crispy Crust:
- Cheddar Crackers: This is a brilliant and kid-friendly hack! A box of your favorite cheesy crackers (like Cheez-It®) is pulsed into fine crumbs to create an instant, perfectly seasoned, and incredibly crunchy and cheesy coating.
- The Gooey Surprise Filling:
- Mozzarella Cheese Sticks: The secret to a perfect, gooey, melted cheese center that won’t all leak out during frying is to use frozen cheese sticks! Freezing the cheese ensures that it melts more slowly, giving the chicken time to cook through before you have a cheese blowout in your hot oil.
- The Decorations: A simple stalk of celery is all you need to create the cute and realistic little pumpkin “stems.”

Step-by-Step to the Best Chicken Pumpkins
This fun and festive meal comes together in a few simple stages.
Part 1: Brine the Chicken and Prepare the Components
Step 1: First, prepare your chicken. Cut a series of deep, crosswise slits into each of your 4 chicken breasts, being careful not to cut all the way through. The slits should be about 3/4 of an inch apart. Then, cut each chicken breast in half lengthwise to create 8 pieces.
Step 2: In a large bowl, whisk together the 3 cups of buttermilk, 2 teaspoons of kosher salt, and 1/4 teaspoon of pepper. Add the chicken pieces to the buttermilk and toss to coat. Cover the bowl and refrigerate for at least 2 hours, or up to overnight.
Step 3: While the chicken is brining, cut each of your 4 mozzarella cheese sticks in half crosswise to create 8 pieces. Place them on a plate and put them in the freezer until they are frozen solid, which will take about 2 hours.
Part 2: Assemble Your Chicken Pumpkins
Step 1: Add your 1 box of Cheddar crackers and 1 teaspoon of salt to a food processor and process until they are finely ground. Transfer the cracker crumbs to a large bowl.Step 2: One at a time, remove a piece of chicken from the buttermilk mixture, letting any excess drip off. Transfer the chicken to the bowl of cracker crumbs and toss it to thoroughly coat.Step 3: Shake off any excess coating and transfer the chicken to a cutting board, with the cut-side facing down. Place one of your frozen pieces of cheese on one end of the chicken and roll the chicken up tightly to enclose the cheese.Step 4: Secure the rolled chicken with a toothpick. Repeat this process with your remaining chicken pieces.
Part 3: Cook to Golden, Crispy Perfection
Step 1: Fill a large Dutch oven or another heavy-bottomed pot with 3 to 4 inches of vegetable oil. Heat the oil over medium heat until a deep-frying thermometer registers 350°F. Set a wire rack on a baking sheet nearby.Step 2: Working in batches of two, carefully lower the coated chicken “pumpkins” into the hot oil using a slotted spoon.Step 3: Fry the chicken for about 4 minutes, until it is a deep golden brown, crispy, and the chicken is cooked all the way through. An instant-read thermometer inserted into the center of the meat (not the cheese) should register 165°F.Step 4: Remove the cooked chicken to the prepared wire rack to drain.Step 5: While the chicken is still hot, carefully remove the toothpick and insert a 1-inch piece of a celery stalk into the center where the cheese is. This will create your “stem.” Serve the hot Chicken Pumpkins immediately with a side of ranch sauce for dipping.

Crispy ‘Chicken Pumpkins’ (The Perfect Halloween Dinner!)
A fun and festive fall-themed recipe for ‘Chicken Pumpkins.’ This dish features pieces of buttermilk-marinated chicken breast that are coated in a savory crust made from finely ground Cheddar crackers. A piece of a frozen mozzarella cheese stick is rolled inside each piece of chicken, which is then secured with a toothpick and deep-fried until golden, crispy, and cooked through. A small piece of a celery stalk is inserted into the melted cheese center to create a ‘pumpkin stem,’ making for a perfect kid-friendly meal or party appetizer.
Ingredients
- 4 chicken breasts (about 2 pounds total)
- 3 cups buttermilk
- Kosher salt and freshly ground black pepper
- 4 mozzarella cheese sticks
- Vegetable oil, for frying
- 2 celery stalks with leaves attached
- One 14.2-ounce box Cheddar crackers (e.g., Cheez-It)
- Ranch sauce, for serving
Instructions
- Cut a series of deep crosswise slits into each chicken breast without cutting all the way through. Then, cut each chicken breast in half lengthwise to create 8 pieces total.
- In a large bowl, whisk together the buttermilk, 2 teaspoons of salt, and 1/4 teaspoon of pepper. Add the chicken, toss to coat, cover, and refrigerate for at least 2 hours or up to overnight.
- Cut each mozzarella stick in half crosswise to create 8 pieces. Freeze them for at least 2 hours, until solid.
- Prepare for Frying: Fill a large Dutch oven or heavy pot with 3 to 4 inches of vegetable oil. Heat over medium heat until a deep-frying thermometer registers 350°F. Set a wire rack on a baking sheet.
- While the oil heats, process the Cheddar crackers in a food processor until finely ground. Transfer the crumbs to a large bowl.
- Coat and Fry the Chicken: One at a time, remove a piece of chicken from the buttermilk, letting the excess drip off. Transfer it to the bowl of cracker crumbs and toss to coat thoroughly.
- Place a piece of frozen cheese on one end of the chicken and roll it up tightly to enclose the cheese. Secure the roll with a toothpick.
- Working in batches of two, carefully lower the coated chicken into the hot oil. Fry for about 4 minutes, until golden, crispy, and a thermometer inserted into the center reads 160°F.
- Remove the chicken to the prepared wire rack to drain.
- Cut eight 1-inch pieces from the skinny tops of the celery stalks to be used as ‘stems.’ Insert a celery stem into the melted cheese center of each ‘pumpkin.’
- Serve hot with ranch sauce for dipping.
Notes
- Special Equipment: A deep-frying thermometer is recommended for this recipe.
- Marinating the chicken in buttermilk is a key step that helps to tenderize the meat.
- Freezing the mozzarella sticks before stuffing the chicken prevents the cheese from melting out too quickly during frying.
- Cooking the chicken in small batches is important to maintain the oil temperature and ensure a crispy, not greasy, result.
Storage and Make-Ahead Tips
- Make-Ahead: For a super-fast and impressive party meal, you can get a head start by preparing all your components in advance. The chicken can be brined, and the cheese can be frozen up to a day ahead of time.
- Storage: Store any leftover cooked chicken pumpkins in an airtight container in the refrigerator for up to 4 days.
- Reheating: The absolute best way to reheat the chicken and bring back its original crispiness is in an air fryer at 375°F (190°C) for just 4-5 minutes. You can also place them on a baking sheet in a hot 400°F (200°C) oven for about 8-10 minutes.
For more recipe follow my pinterest account
Creative Recipe Variations (“Make it Your Own Pumpkin Patch!”)
- Use a Different Crispy Coating: If you’re not a fan of cheese crackers, you can easily substitute them with an equal amount of Panko breadcrumbs or finely crushed cornflakes.
- Add a Spicy Surprise: For a delicious, spicy kick, you can wrap a thin slice of pepperoni or a small piece of a pickled jalapeño around the cheese stick before you stuff it into the chicken.
- Use a Different Dipping Sauce: While a cool and creamy ranch is a classic choice, these Chicken Pumpkins are also absolutely fantastic when served with a tangy honey-mustard sauce or a simple marinara sauce.
Enjoy The Ultimate Fun & Festive Halloween Dinner!
You’ve just created a truly special dish that is a perfect harmony of fun, classic ingredients and delicious, satisfying flavors. These classic “Chicken Pumpkins” are a testament to the power of a simple, creative idea to become an instant family favorite and a treasured holiday tradition. It’s a rewarding and deeply satisfying recipe that is sure to make your Halloween party a memorable one.
We hope you enjoy every last, perfect, and delicious bite!
If you enjoyed making this recipe, please leave a comment below or share it with a friend who loves an easy and impressive meal!
Frequently Asked Questions (FAQs)
Q1: What is the absolute, number one secret to super juicy and tender fried chicken?
The secret is a buttermilk brine! Soaking your chicken in a simple buttermilk and salt mixture for at least a few hours is a classic and foolproof technique. The natural acidity and the enzymes in the buttermilk work as a gentle tenderizer, breaking down the tough proteins in the chicken and guaranteeing an incredibly moist and flavorful result.
Q2: Can I make these Chicken Pumpkins in an air fryer or in the oven instead of deep-frying them?
Yes, absolutely! For the air fryer, preheat it to 390°F (200°C). Spray the assembled chicken pumpkins with a nonstick cooking spray and cook for about 12-15 minutes, flipping them halfway through, until they are golden brown and cooked through. For the oven, preheat it to 400°F (200°C). Place the chicken on a wire rack set inside a baking sheet, spray them with cooking spray, and bake for about 20-25 minutes, until they are crispy and cooked through.
Q3: Why do I have to freeze the cheese sticks before I use them?
This is a brilliant and crucial trick! By freezing the mozzarella sticks solid, you are ensuring that the cheese will melt much more slowly in the hot oil. This is the key that gives the chicken enough time to cook all the way through before the cheese has a chance to completely melt and ooze out into the fryer, which would create a “cheese blowout” and a big mess.
Q4: Can I make these ahead of time for a party?
For the absolute best and crispiest result, it is highly recommended to fry these chicken pumpkins right before you plan to serve them. However, you can save a ton of time by brining your chicken and freezing your cheese a day in advance, which will make the final assembly and cooking process much faster.
Q5: What is the safest way to deep-fry at home?
The key to safe deep-frying is to use a heavy-bottomed, deep pot (like a Dutch oven), to use a deep-fry thermometer to carefully monitor and maintain your oil temperature, and to never overcrowd the pot, which can cause the oil temperature to drop. Always use a long-handled, slotted spoon to gently lower and remove your food from the hot oil.


