The Ultimate No-Bake Patriotic Oreo Balls (Perfect for the 4th of July!)
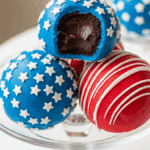
A festive, no-bake recipe for ‘Patriotic Oreo Balls’. The dessert is made by crushing Oreo cookies into fine crumbs and mixing them with softened cream cheese to form a dough. This dough is rolled into balls and chilled until firm. The balls are then dipped in either red or blue candy melts and decorated accordingly: the blue balls are topped with white star confetti, and the red balls are drizzled with melted white candy wafers to create a red, white, and blue patriotic theme.
- Prep Time: 3 hours (includes chilling time)
- Cook Time: 10 minutes (for melting candy)
- Total Time: 3 hours 10 minutes
- Yield: 36-48 balls
- Category: Dessert
- Method: No-Bake, Dipping, Chilling
- Cuisine: American
- Diet: Vegetarian
Ingredients
- 1 (1 lb 2.12 oz) Family Size package of Oreo Cookies
- 1 (8-ounce) block of cream cheese, softened to room temperature
- 1 (12-ounce) bag of red candy melts
- 1 (12-ounce) bag of blue candy melts
- ⅓ cup Ghirardelli white melting wafers
- White star confetti sprinkles, for topping
Instructions
- Line two baking trays with parchment paper.
- In a food processor or high-speed blender, pulse the Oreo cookies until they form fine crumbs.
- In a large mixing bowl, beat the softened cream cheese with a hand mixer on high speed until smooth.
- Add the Oreo crumbs to the cream cheese and mix on medium speed until well combined.
- Using a 1.5-inch cookie scoop, form even-sized balls and roll them between your palms until smooth. Place the rolled balls on the prepared baking trays.
- Chill the trays of Oreo balls in the refrigerator for 2 hours, or in the freezer for 15-20 minutes until firm.
- For the blue-coated balls: Remove one tray from the refrigerator. Melt the blue candy melts in a double boiler or microwave-safe bowl, stirring every 30 seconds until smooth.
- Using a fork, dip one Oreo ball at a time into the blue melts, ensuring it’s fully coated. Tap the fork on the side of the bowl to remove excess coating.
- Place the coated ball back on the baking tray and immediately top with white star confetti sprinkles. Repeat for all balls on the tray. Refrigerate to set.
- For the red-coated balls: Remove the second tray from the refrigerator. Melt the red candy melts until smooth.
- Dip the remaining balls in the red melts using the same fork method and place them on the baking tray.
- Melt the white wafers in a small piping bag in the microwave in 30-second increments. Snip a very small piece off the tip of the bag and drizzle white stripes over the red-coated Oreo balls.
- Return the tray to the refrigerator for about 10 minutes for the coating to set completely.
- Keep the finished Oreo balls refrigerated in an airtight container until ready to serve.
Notes
- A food processor or high-speed blender is recommended for creating fine Oreo crumbs.
- Chilling the Oreo balls thoroughly before dipping is crucial to help them hold their shape and for the candy coating to set quickly.
- Using a fork to dip the balls allows the excess candy coating to drip off easily.
- The finished Oreo balls should be stored in the refrigerator.
Find it online: https://cookupjoy.com/oreo-balls-2/
